Forget everything you think you know about curling your lashes. No, really. Because if you’ve ever pinched your eyelid, snapped a lash in half, or wondered why your curl vanished the moment mascara touched it someone taught you wrong. The eyelash curler isn’t the villain of your makeup bag. Misuse is.
Used correctly, an eyelash curler can open your eyes, make lashes look longer without extensions, and instantly upgrade even a bare-face day. Used incorrectly, it becomes the tiny medieval torture device people love to hate.
This guide is here to flip the script. Whether you’re a complete beginner or someone who’s been curling lashes for years but never quite mastered it, this step-by-step breakdown will show you how to use an eye lash curler safely, effectively, and like a pro no ripped lashes, no regrets.
Why Curling Your Eyelashes Matters
Eyelashes aren’t just decorative. They frame your eyes, affect how awake you look, and subtly influence facial balance.
Here’s why curling them correctly makes such a difference:
1. It Instantly Opens the Eyes
Straight lashes tend to point downward, casting shadows and making eyes look smaller. Curling lifts lashes upward, creating the illusion of wider, brighter eyes.
2. It Enhances Mascara Performance
Mascara works best on lashes that are already lifted. Curling first allows mascara to hold shape instead of weighing lashes down.
3. It Reduces the Need for Heavy Makeup
Properly curled lashes can replace false lashes on many days. The eye area looks defined without extra products.
4. It Improves Symmetry
Even naturally long lashes can grow unevenly. Curling helps align them for a cleaner, more balanced look.
When used correctly, curling isn’t optional it’s foundational.
Types of Eyelash Curlers
Not all curlers are created equal. Understanding the different types helps you choose the right tool for your eye shape, lash length, and lifestyle.
1. Classic Clamp Curlers
This is the traditional scissor-style curler most people recognize. It uses a rubber pad and a curved clamp to shape lashes.
Best for:
- Beginners
- Medium to long lashes
- Most eye shapes
2. Half-Lash or Corner Curlers
Smaller and narrower, these curlers are designed for outer or inner lashes.
Best for:
- Almond or hooded eyes
- Precision curling
- Touch-ups after mascara
3. Heated Eyelash Curlers
These use gentle heat (battery or USB powered) to set curls similarly to a curling iron for hair.
Best for:
- Very straight lashes
- Lashes that won’t hold a curl
- Long-lasting results
4. Travel or Compact Curlers
Mini versions designed for on-the-go use.
Best for:
- Quick touch-ups
- Travel makeup kits
Choosing the right type dramatically improves results and reduces the risk of lash damage.
Advantages of Using an Eyelash Curler
When used correctly, an eyelash curler offers benefits that go beyond aesthetics.
1. Non-Invasive Enhancement
Unlike lash lifts or extensions, curling causes no chemical or structural alteration when done properly.
2. Immediate Results
No waiting, no drying time. One curl session gives instant lift.
3. Budget-Friendly
Compared to professional treatments, curlers are affordable and reusable for years.
4. Versatility
Works with minimal makeup, full glam, or no makeup at all.
5. Customizable Look
You control how subtle or dramatic the curl is based on pressure and technique.
Key Features to Look For in a Quality Curler
A good eyelash curler isn’t about brand hype it’s about engineering.
1. Curvature That Matches Your Eye Shape
Too flat? It won’t reach lashes. Too curved? It pinches skin.
2. Cushioned Rubber Pad
Prevents lash breakage and creates a smooth curve.
3. Smooth Hinge Mechanism
Avoid stiff or jerky movement. Control matters.
4. Durable Frame
Weak metal bends over time, ruining curl consistency.
5. Replaceable Pads
Fresh pads = better grip and safer curling.
These features are often highlighted when shopping from a reputable beauty online store, where detailed product specifications help you compare before buying.
Benefits of Curling Your Lashes the Right Way
Curling isn’t just about appearance it affects eye health and lash longevity.
1. Healthier Lashes Over Time
Correct technique minimizes breakage and shedding.
2. Less Mascara Required
Lifted lashes need fewer coats to look full.
3. Longer-Lasting Eye Makeup
Curls hold shape better, even in humidity.
4. More Polished Look
Eyes appear more awake, balanced, and expressive.
5. Confidence Boost
It’s a small step that makes a noticeable difference.
Step-by-Step: How to Use an Eyelash Curler Correctly
This is the heart of the guide. Follow these steps exactly.
Step 1: Start With Clean, Dry Lashes
Never curl lashes with mascara on. Mascara makes lashes stiff and prone to snapping.
Rule:
- No mascara
- No wet lashes
- No oil residue
Step 2: Check the Curler Pad
Ensure the rubber pad is intact and clean. Cracked or hardened pads cause lash damage.
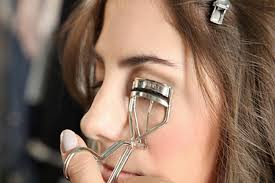
Step 3: Position the Curler Correctly
Open the curler fully. Place it at the base of your upper lashes, as close to the lash line as possible without touching the skin.
Look straight into the mirror not down.
Step 4: Gently Clamp (Do Not Yank)
Close the curler slowly until you feel light pressure.
Hold for 5–8 seconds.
Do not squeeze aggressively.
Step 5: Use the “Pumping” Technique
Without fully releasing, slightly open the curler and move it upward along the lash length.
Clamp again for 3–5 seconds.
Repeat once more near the tips.
This creates a natural curve instead of a harsh bend.
Step 6: Release Slowly
Open the curler gently and pull it away from your eye. Never yank.
Step 7: Apply Mascara After Curling
Now apply mascara from root to tip using a lifting motion.
Mascara locks in the curl never the other way around.
Common Mistakes to Avoid
Even experienced users make these errors.
Curling After Mascara
This is the fastest way to break lashes.
Pulling or Twisting the Curler
Curlers should press, not drag.
Using Old Rubber Pads
Replace pads every 3–6 months.
Curling Lower Lashes
Most curlers aren’t designed for lower lashes use mascara instead.
Over-Curling
More pressure doesn’t mean better results.
Safety Tips for Long-Term Lash Health
- Clean your curler weekly with alcohol
- Replace rubber pads regularly
- Never share curlers
- Stop immediately if you feel pain
- Avoid curling brittle or damaged lashes
Pairing good technique with high-quality makeup products ensures your lashes stay strong and flexible over time.
Conclusion
The eyelash curler isn’t outdated. It isn’t dangerous. And it definitely isn’t optional if you want truly lifted lashes.
The problem was never the tool it was the technique.
When you understand how to position it, how much pressure to apply, and when to use it in your routine, an eyelash curler becomes one of the most powerful and underrated tools in your beauty arsenal.
Master these steps, avoid the common mistakes, and you’ll get long-lasting curl, healthier lashes, and eyes that look naturally awake no extensions required.
Frequently Asked Questions
Is it safe to use an eyelash curler every day?
Yes, if used correctly on clean lashes with a padded curler.
Should I heat my eyelash curler?
Heated curlers are safer than manually heating metal curlers with a hairdryer.
Can curling damage eyelashes permanently?
Only if done incorrectly or with damaged tools.
How long does a curl last?
Typically all day, especially when sealed with mascara.
Do eyelash curlers work on short lashes?
Yes, but a smaller or precision curler works best.


Leave a Reply