Introduction
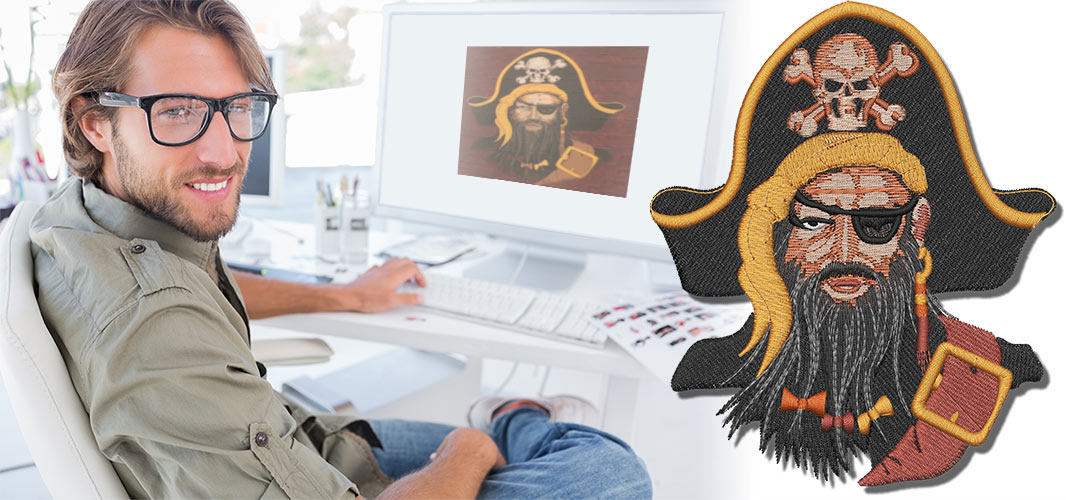
You have a great image saved as a JPG—maybe a family photo, a team logo, or a piece of digital art. You can already see it stitched onto a quilt block, a tote bag, or a special garment. If you’re a Husqvarna Viking embroidery machine owner, you know the final step to making this happen is creating a HUS file. The desire to Convert JPG to HUS Embroidery Files is a common starting point for a creative journey. While it sounds technical, the process is a learnable craft. This isn’t a magic one-click conversion; it’s a step-by-step translation from pixels to stitches. This tutorial will guide you through each stage, from preparing your image to saving the final file, demystifying the process and setting you up for success with your Viking machine.
What This Tutorial Will (and Won’t) Achieve
Before we start, let’s set clear expectations. This tutorial will teach you the fundamental process of digitizing—turning a picture into stitch instructions.
- You Will Learn: The core workflow used by professionals, how to use key software tools, and the critical thinking needed to translate an image.
- You Will Not Get: A fully automatic, perfect result from any image. Complex photographs with shadows and gradients will require advanced skills. This tutorial focuses on simple, high-contrast images like logos, silhouettes, or bold line art. These are the perfect starting points.
Understanding that this is a craft and not just a conversion is the first and most important step.
Pre-Work: Preparing Your JPG for Success
Don’t skip this! A clean starting image makes every following step easier.
- Choose the Right Image: Select a JPG with clear edges, high contrast, and minimal detail. A simple black logo on a white background is ideal. Avoid busy photos or images with subtle shading.
- Edit in a Photo Editor: Use a free tool like GIMP, Photoshop, or even the basic Photos app on your computer.
- Crop tightly to the design.
- Increase Contrast to make edges pop.
- Remove the Background if possible, leaving just the design on a transparent layer (and save as a PNG for this step). If you can’t, we’ll handle it in the embroidery software.
- Convert to Grayscale: This helps you see the shapes without color distraction.
Tools You’ll Need
- Your Prepared JPG.
- Digitizing Software: For this tutorial, we’ll use Hatch Embroidery by Wilcom as our example. It’s user-friendly, powerful, and offers a free trial. The principles also apply to Viking’s own Premier+ software or other prosumer programs.
- Your Viking Machine Manual: To confirm it uses the .HUS format (most do, but some may use .VP3).
The Step-by-Step Digitizing Process
Step 1: Launch Software & Set Up Your Workspace
Open Hatch Embroidery. Create a new file. Set your hoop size to match what you’ll use on your machine (e.g., Large Oval). This defines your workspace.
Action: File > New, select your hoop.
Step 2: Import Your JPG as an Underlay
Think of your JPG as a tracing guide. We’ll place it on a layer we can draw over.
Action: Look for the “Image” or “Underlay” tool (often an icon of a mountain or photo). Click it, then navigate to and select your prepared JPG file. It will appear in your hoop area.
Step 3: Resize the Image to Your Final Dimensions
Your JPG likely isn’t the right physical size. We’ll lock it in now.
Action:
- Click on the imported image to select it.
- Find the “Size” or “Resize” fields in the toolbar or properties panel.
- Enter your desired width (e.g., 4.0 inches). Ensure the “Lock Aspect Ratio” chain icon is closed so the height scales proportionally.
- Lock the Image: Find an option to “Lock” the underlay or set it as a “Template.” This prevents you from accidentally moving it.
Step 4: Trace the Design – Creating Stitch Areas
This is the heart of digitizing. We will manually create stitch objects over the JPG.
For a Simple Silhouette Logo:
- Select the Fill Stitch tool.
- Use the Point Creation Tool (often a pen icon with dots) to click points around the entire outer edge of your design. Connect the last point to the first.
- You have now created your first embroidery object! It will fill with a color, covering the shape.
For a Design with Separate Elements (like text inside a shape):
You must create separate objects for each color area.
- Trace the background shape first with the Fill Stitch tool.
- Then, trace the foreground text or shape as a second, separate object. The software will automatically create a hole where they overlap if the objects are in the correct order.
Step 5: Assign Stitch Properties & Add Underlay
Now we engineer how each object stitches. This is key to quality.
Action:
- Click on an object you created.
- Open the Object Details or Properties panel (usually on the right).
- Stitch Type: Ensure it’s set to “Fill” for large areas. If you have thin lines, you’d change them to “Satin.”
- Density: For a standard cotton, start with a setting around 0.40mm. This controls how close the stitches are.
- UNDERLAY – CRITICAL STEP: In the properties, find the Underlay section. Click to add it. Choose a type. For a fill area, start with “Edge Run + Perpendicular”. This adds a grid of stabilizing stitches first, preventing puckering.
Step 6: Set the Stitch Sequence & Colors
Tell the machine what order to sew in.
Action:
- Look for the “Object List” or “Color Sequence” panel. You’ll see your objects listed.
- Click and drag to order them. Rule: The object farthest in the background should be at the TOP of the list (sews first). The foreground object should be at the BOTTOM (sews last).
- Click the color block next to each object to assign a real thread color from the palette (e.g., Viking / Madeira threads).
Step 7: Generate Stitches & Preview
Let the software calculate the actual stitch path and see your work in 3D.
Action:
- Find the “Generate Stitches” or “Apply” button. Click it.
- Then, find the 3D Stitch Preview or Simulation mode (often an icon of a shirt/hoop in 3D). Click to run it.
- Watch the animation closely. This shows you exactly how the machine will sew it. Look for gaps, jumps, or areas that look too dense.
Step 8: Save/Export as a HUS File
Your design is ready for the machine.
Action:
- Go to
File > Save AsorExport. - In the “Save as type” dropdown, scroll and select .HUS. It might be listed as “Husqvarna Viking (.hus)”.
- You may be prompted to select your specific Viking machine model. Choose it from the list for optimal compatibility.
- Name your file and save it to the USB drive you use with your Viking machine.
The Non-Negotiable Final Step: The Test Stitch
Your digital file is a prototype. The fabric tells the truth.
- Hoop Scrap Fabric: Use a scrap of the actual fabric your final project will use (e.g., a cotton quilting square, a piece of denim). Use appropriate stabilizer.
- Load and Stitch: Transfer the .HUS file to your machine via USB. Stitch it out on the scrap.
- Analyze the Result:
- Puckering? Density is too high or underlay is too weak. Go back to Step 5 and reduce density or add a stronger underlay.
- Gaps or Fabric Showing? Density is too low. Increase it slightly.
- Edges Not Crisp? You may need to add a “Satin” stitch border around the fill area, or your original JPG tracing wasn’t smooth enough.
- Refine and Re-save: Go back to your software, make the adjustments, re-export the .HUS file, and test again. This cycle is normal and how professionals dial in perfect results.
Troubleshooting Common Issues
- “My design looks blocky/jagged!” You traced too loosely or used too few points in Step 4. Zoom in and use the Node Editor tool to smooth the points on your object’s path.
- “The machine stops and wants to change color, but I only have one object!” You may have created multiple small, disconnected objects by accident. Use the “Combine” or “Merge” tool to join them into one.
- “I can’t get the background out!” If your JPG had a busy background, tracing around it is hard. This is why pre-editing to remove the background is so important. In software, you can sometimes use the “Magic Wand” select tool on the underlay image to help auto-trace the shape you want.
Conclusion: Your Journey from Pixels to Stitches
This tutorial has given you the foundational map to Convert JPG to HUS Embroidery Files. Remember, your first attempts are about learning the workflow, not achieving perfection. Start with the simplest image you can find—a solid heart shape, a bold letter—and follow these steps.
Each time you complete the cycle (Prepare, Trace, Engineer, Test, Refine), you’ll build the intuition that turns this technical process into a creative craft. Your Husqvarna Viking is a powerful partner, capable of stunning work. By learning to create thoughtful .HUS files, you’re unlocking its full potential and ensuring the images you love are rendered in thread with the quality they deserve. Now, go find that simple JPG and start your first digitizing project.


Leave a Reply